Why You’ll Love This Recipe
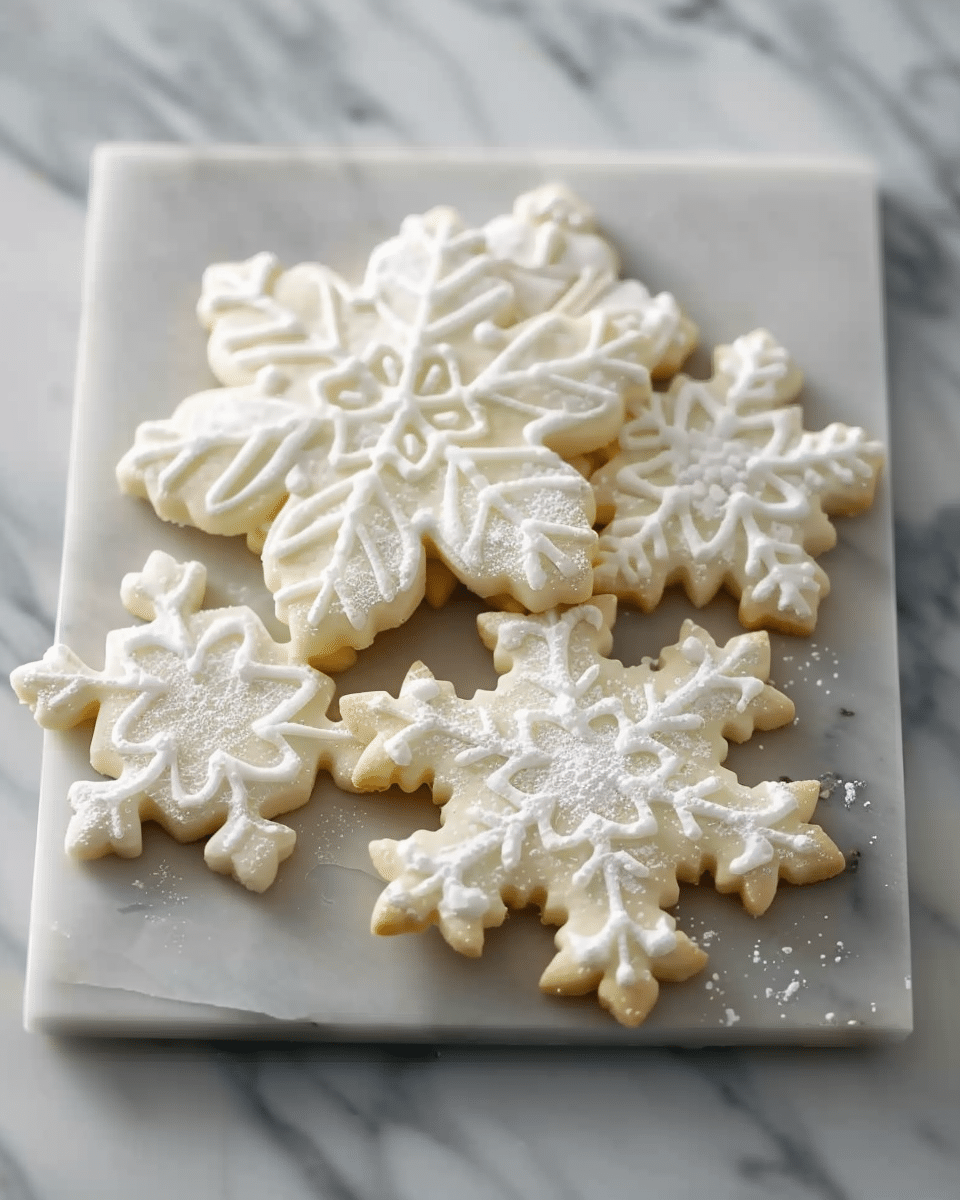
Snowflake Sugar Cookies are everything you love about sugar cookies—soft, buttery, and slightly sweet—but with the added charm of intricate snowflake shapes and festive decorations. The dough is easy to work with and holds its shape when baked, allowing for crisp edges and beautiful designs. The snowflakes can be decorated with simple royal icing, sprinkles, or even edible glitter to add a winter wonderland effect. These cookies are not only a joy to eat but also a wonderful holiday activity to do with family or friends!
Ingredients
For the cookies:
- 2 3/4 cups all-purpose flour
- 1 teaspoon baking soda
- 1/2 teaspoon baking powder
- 1 cup unsalted butter, softened
- 1 1/2 cups granulated sugar
- 1 large egg
- 1 teaspoon vanilla extract
- 1/2 teaspoon almond extract (optional)
- 1/4 teaspoon salt
For the decoration:
- Royal icing (store-bought or homemade)
- Colored sugar, sprinkles, or edible glitter (optional)
(Tip: You’ll find the full list of ingredients and measurements in the recipe card below.)
Directions
1. Prepare the dough:
- In a medium bowl, whisk together the flour, baking soda, baking powder, and salt. Set aside.
- In a large bowl, beat the softened butter and granulated sugar together until light and fluffy, about 3-4 minutes.
- Add the egg, vanilla extract, and almond extract (if using), and beat until well combined.
- Gradually add the dry ingredients to the wet ingredients, mixing just until incorporated. The dough will be slightly soft but should hold together.
- Divide the dough in half, flatten each half into a disk, and wrap them tightly in plastic wrap. Chill the dough in the refrigerator for at least 1 hour, or up to 24 hours.
2. Roll out the dough:
- Preheat the oven to 350°F (175°C) and line two baking sheets with parchment paper.
- Once the dough has chilled, remove one disk from the fridge and roll it out on a lightly floured surface to about 1/8-inch thickness.
- Use snowflake-shaped cookie cutters to cut out the dough. If the dough is sticky, lightly dust the rolling pin and surface with flour.
- Place the cut-out cookies onto the prepared baking sheets, leaving about 1 inch of space between them.
3. Bake the cookies:
- Bake the cookies in the preheated oven for 8-10 minutes, or until the edges are lightly golden. The centers should remain soft but set.
- Allow the cookies to cool on the baking sheet for 5 minutes, then transfer them to a wire rack to cool completely.
4. Decorate the cookies:
- Once the cookies are completely cool, decorate them with royal icing or other decorations of your choice. You can pipe simple snowflake designs onto the cookies, add sprinkles or edible glitter for a touch of sparkle, or even use colored sugar to make them festive.
- Let the icing set for about 30 minutes before serving or packaging.
5. Serve and enjoy:
- Once the icing has dried, your Snowflake Sugar Cookies are ready to be served, gifted, or enjoyed with a warm cup of cocoa!
Servings and timing
- Servings: 24-30 cookies (depending on size of snowflakes)
- Total time: 2 hours 30 minutes (including chilling time)
- Prep time: 15 minutes
- Chill time: 1 hour
- Bake time: 8-10 minutes
- Decorating time: 30 minutes
Variations
- Decorating options: Instead of royal icing, you can use melted chocolate, buttercream frosting, or even a simple glaze to decorate the cookies. You can also dust them with powdered sugar for a snowy effect.
- Add citrus zest: For an extra burst of flavor, try adding orange or lemon zest to the dough for a light, citrusy twist.
- Sprinkles: You can use silver or white sprinkles for a snowy effect or colorful sprinkles for a more festive look.
- Use other shapes: While snowflakes are traditional for winter, you can also use other cookie cutters to create stars, trees, or hearts for different occasions.
Storage/Reheating
- Storage: Store the decorated cookies in an airtight container at room temperature for up to 1 week. Make sure the royal icing is completely dry before stacking the cookies to prevent smudging.
- Freezing: These cookies freeze well. Place the decorated cookies in a single layer on a baking sheet and freeze until firm. Then, transfer them to an airtight container or freezer bag and store for up to 2 months. Thaw at room temperature before serving.
FAQs
Can I use store-bought dough?
Yes, you can use store-bought sugar cookie dough for convenience. However, homemade dough will give you better flavor and texture, and it’s easy to make!
Can I make these cookies ahead of time?
Yes, the dough can be made ahead of time and stored in the refrigerator for up to 24 hours. You can also bake the cookies in advance and decorate them later.
Can I make these cookies vegan?
Yes, you can make these cookies vegan by substituting the butter with vegan butter and using a flax egg (1 tablespoon ground flaxseed + 3 tablespoons water) instead of the egg. Use plant-based extracts like vanilla and almond.
How can I make the royal icing for decorating?
To make royal icing, combine 2 cups powdered sugar, 1 egg white (or 1 tablespoon meringue powder), and 2 teaspoons lemon juice. Beat until stiff peaks form. For a smoother consistency, add a little water.
Can I use different cookie cutters?
Absolutely! You can use any shape of cookie cutter you prefer. Christmas trees, stars, or even hearts would be fun alternatives to snowflakes.
Conclusion
Snowflake Sugar Cookies are a delightful holiday treat that’s perfect for baking with family, gifting to loved ones, or simply enjoying yourself. The combination of buttery dough, sweet icing, and festive decorations makes these cookies not only delicious but also fun to create. With endless decorating possibilities and a soft, chewy texture, Snowflake Sugar Cookies will add a touch of magic to any winter celebration!
Print
Snowflake Sugar Cookies
- Total Time: 2 hours 30 minutes
- Yield: 24-30 cookies
- Diet: Vegetarian
Description
Snowflake Sugar Cookies are buttery, soft, and decorated with intricate snowflake shapes and sparkling sugar, making them perfect for holiday celebrations and cozy winter afternoons.
Ingredients
- 2 3/4 cups all-purpose flour
- 1 teaspoon baking soda
- 1/2 teaspoon baking powder
- 1 cup unsalted butter, softened
- 1 1/2 cups granulated sugar
- 1 large egg
- 1 teaspoon vanilla extract
- 1/2 teaspoon almond extract (optional)
- 1/4 teaspoon salt
- Royal icing (store-bought or homemade)
- Colored sugar, sprinkles, or edible glitter (optional)
Instructions
In a medium bowl, whisk together the flour, baking soda, baking powder, and salt. Set aside.
- In a large bowl, beat the softened butter and granulated sugar together until light and fluffy, about 3-4 minutes.
- Add the egg, vanilla extract, and almond extract (if using), and beat until well combined.
- Gradually add the dry ingredients to the wet ingredients, mixing just until incorporated. The dough will be slightly soft but should hold together.
- Divide the dough in half, flatten each half into a disk, and wrap them tightly in plastic wrap. Chill the dough in the refrigerator for at least 1 hour, or up to 24 hours.
- Preheat the oven to 350°F (175°C) and line two baking sheets with parchment paper.
- Once the dough has chilled, remove one disk from the fridge and roll it out on a lightly floured surface to about 1/8-inch thickness.
- Use snowflake-shaped cookie cutters to cut out the dough. If the dough is sticky, lightly dust the rolling pin and surface with flour.
- Place the cut-out cookies onto the prepared baking sheets, leaving about 1 inch of space between them.
- Bake the cookies in the preheated oven for 8-10 minutes, or until the edges are lightly golden. The centers should remain soft but set.
- Allow the cookies to cool on the baking sheet for 5 minutes, then transfer them to a wire rack to cool completely.
- Once the cookies are completely cool, decorate them with royal icing or other decorations of your choice.
- Let the icing set for about 30 minutes before serving or packaging.
Notes
- Decorating options include royal icing, melted chocolate, buttercream frosting, or a simple glaze.
- For a citrus twist, add orange or lemon zest to the dough.
- Use silver or white sprinkles for a snowy effect, or colorful sprinkles for a more festive look.
- You can also use other shapes like stars, trees, or hearts for different occasions.
- Prep Time: 15 minutes
- Cook Time: 8-10 minutes
- Category: Dessert
- Method: Baking
- Cuisine: American
Nutrition
- Serving Size: 1 cookie
- Calories: 120
- Sugar: 8g
- Sodium: 45mg
- Fat: 6g
- Saturated Fat: 4g
- Unsaturated Fat: 1g
- Trans Fat: 0g
- Carbohydrates: 15g
- Fiber: 0g
- Protein: 1g
- Cholesterol: 20mg


