Why You’ll Love This Recipe
This No-Bake Vegan Chocolate Tart is a game-changer when it comes to indulgent desserts. The combination of a buttery, nut-based crust and a velvety chocolate filling makes for an irresistible treat. The best part? It’s vegan, meaning it’s dairy-free and egg-free, but still rich and delicious. You’ll love how simple it is to prepare, with no need for baking—just assemble, chill, and enjoy. It’s perfect for a party, a special celebration, or whenever you’re craving a rich chocolate dessert that doesn’t take much effort.
Ingredients
For the crust:
-
1 ½ cups almond flour
-
1 cup medjool dates, pitted
-
¼ cup unsweetened shredded coconut
-
1 tbsp coconut oil, melted
-
1 tsp vanilla extract
-
A pinch of salt
For the filling:
-
1 ½ cups dark chocolate (dairy-free)
-
1 can (13.5 oz) full-fat coconut milk
-
2 tbsp maple syrup
-
1 tsp vanilla extract
-
A pinch of salt
(Tip: You’ll find the full list of ingredients and measurements in the recipe card below.)
Directions
-
Prepare the crust:
In a food processor, combine the almond flour, pitted dates, shredded coconut, melted coconut oil, vanilla extract, and salt. Pulse until the mixture comes together and sticks when pressed.
Press the mixture into the bottom of a tart pan (preferably with a removable bottom), creating an even layer. Use your fingers or the back of a spoon to pack it down tightly.
Place the crust in the fridge to chill while you make the filling. -
Make the filling:
In a heatproof bowl, melt the dark chocolate over a double boiler or in the microwave in 20-second intervals, stirring in between. Once melted, remove from heat and let cool slightly.
In a saucepan, warm the coconut milk over medium heat until it begins to simmer. Remove from heat and stir in the maple syrup, vanilla extract, and a pinch of salt.
Slowly pour the warm coconut milk mixture into the melted chocolate, whisking until smooth and fully combined. -
Assemble the tart:
Pour the chocolate filling into the prepared crust, spreading it evenly with a spatula.
Refrigerate the tart for at least 4 hours or overnight to allow the filling to set. -
Serve:
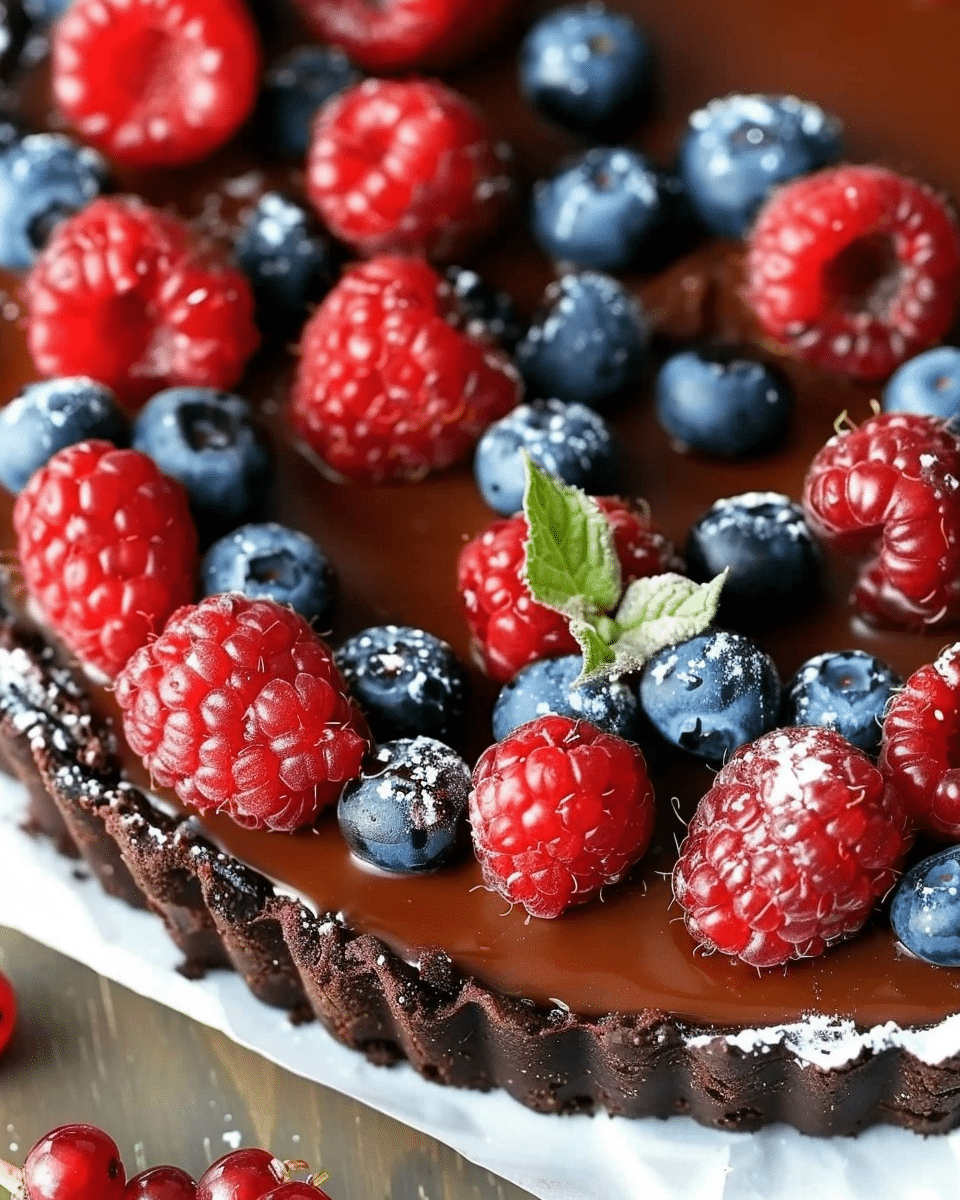
Once set, remove the tart from the fridge, carefully remove from the tart pan, and slice. You can garnish with shaved chocolate, fresh berries, or a sprinkle of sea salt for an extra touch.
Servings and Timing
-
Servings: 8-10 slices
-
Preparation time: 20 minutes
-
Chilling time: 4 hours (or overnight)
-
Total time: 4 hours 20 minutes (or overnight)
Variations
-
Nut-Free Crust: For a nut-free option, substitute the almond flour with oat flour and the almonds in the crust with sunflower seeds or pumpkin seeds.
-
Flavored Chocolate: Add a few drops of peppermint extract, orange zest, or a pinch of cinnamon to the chocolate filling for a unique flavor twist.
-
Berry Topping: Top the tart with fresh raspberries, strawberries, or blueberries for a fruity contrast to the rich chocolate.
Storage/Reheating
-
Storage: Store the tart in an airtight container in the refrigerator for up to 5 days. It’s best served chilled.
-
Reheating: This tart is not meant to be heated. Keep it in the fridge and serve it cold for the best texture and flavor.
FAQs
1. Can I use another type of nut for the crust?
Yes, you can substitute almonds with cashews, walnuts, or pecans for a slightly different flavor and texture.
2. Can I make the tart crust ahead of time?
Absolutely! You can prepare the crust in advance and store it in the fridge for up to 2 days before adding the filling.
3. Can I make this tart gluten-free?
Yes, this tart is naturally gluten-free because the crust is made from almond flour and dates. It’s a great gluten-free dessert option!
4. Is there an alternative to coconut milk in the filling?
You can substitute the coconut milk with another full-fat non-dairy milk, such as cashew milk or oat milk, but the texture and richness might vary slightly.
5. Can I use sweetened chocolate for the filling?
You can, but it will make the tart much sweeter. If you use sweetened chocolate, reduce or omit the maple syrup in the filling to prevent it from becoming too sweet.
6. How do I prevent the filling from separating?
Make sure to mix the melted chocolate and warm coconut milk thoroughly until they’re fully incorporated. Whisk continuously to avoid separation.
7. Can I freeze this tart?
Yes, you can freeze this tart. Once set, wrap it tightly in plastic wrap and foil, and store it in the freezer for up to 3 months. Thaw in the fridge for a few hours before serving.
8. How do I make the tart extra glossy?
For a glossy finish, gently melt some more chocolate and pour it over the top of the tart after it has set. Let it harden for a smooth, shiny layer.
9. Can I use another sweetener instead of maple syrup?
Yes, you can use agave syrup, coconut nectar, or any liquid sweetener you prefer in place of maple syrup.
10. How can I tell when the tart is ready to serve?
Once the filling has set and is firm to the touch, the tart is ready to be served. It should have a smooth, firm texture without being too soft or runny.
Conclusion
This No-Bake Vegan Chocolate Tart is the perfect dessert for chocolate lovers who want something rich, indulgent, and completely plant-based. With its simple ingredients, no-bake preparation, and velvety chocolate filling, it’s the ideal treat for any occasion. Whether you’re entertaining guests, celebrating a special event, or just satisfying your chocolate cravings, this tart is sure to impress. Plus, with its easy customization options, you can make it your own!

No-Bake Vegan Chocolate Tart
5 Stars 4 Stars 3 Stars 2 Stars 1 Star
No reviews
- Author: Ava
- Total Time: 4 hours 20 minutes (or overnight)
- Yield: 8-10 slices
- Diet: Vegetarian
Description
This No-Bake Vegan Chocolate Tart is the ultimate rich and decadent dessert for anyone looking for a plant-based, dairy-free treat. The smooth, velvety chocolate filling pairs perfectly with a crunchy nut-based crust, creating an indulgent yet simple dessert that doesn’t require any baking. Perfect for vegan diets, celebrations, or any occasion, this tart is both easy to make and impressively delicious.
Ingredients
For the crust:
1 ½ cups almond flour
1 cup medjool dates, pitted
¼ cup unsweetened shredded coconut
1 tbsp coconut oil, melted
1 tsp vanilla extract
A pinch of salt
For the filling:
1 ½ cups dark chocolate (dairy-free)
1 can (13.5 oz) full-fat coconut milk
2 tbsp maple syrup
1 tsp vanilla extract
A pinch of salt
Instructions
-
Prepare the crust:
-
In a food processor, combine the almond flour, pitted dates, shredded coconut, melted coconut oil, vanilla extract, and salt. Pulse until the mixture comes together and sticks when pressed.
-
Press the mixture into the bottom of a tart pan (preferably with a removable bottom), creating an even layer. Pack it down tightly using your fingers or the back of a spoon.
-
Place the crust in the fridge to chill while you make the filling.
-
-
Make the filling:
-
In a heatproof bowl, melt the dark chocolate over a double boiler or in the microwave, heating in 20-second intervals and stirring in between. Once melted, remove from heat and let it cool slightly.
-
In a saucepan, warm the coconut milk over medium heat until it begins to simmer. Remove from heat and stir in the maple syrup, vanilla extract, and a pinch of salt.
-
Slowly pour the warm coconut milk mixture into the melted chocolate, whisking until smooth and fully combined.
-
-
Assemble the tart:
-
Pour the chocolate filling into the prepared crust, spreading it evenly with a spatula.
-
Refrigerate the tart for at least 4 hours or overnight to allow the filling to set.
-
-
Serve:
-
Once set, remove the tart from the fridge, carefully remove it from the tart pan, and slice. Garnish with shaved chocolate, fresh berries, or a sprinkle of sea salt for an extra touch before serving.
-
Notes
-
Storage: Store the tart in an airtight container in the refrigerator for up to 5 days.
-
Freezing: You can freeze this tart by wrapping it tightly in plastic wrap and foil, and store it in the freezer for up to 3 months. Thaw in the fridge for a few hours before serving.
-
Reheating: This tart is meant to be served cold, and should not be reheated.
- Prep Time: 5min
- Cook Time: 4 hours (or overnight)
- Category: Dessert
- Method: No-Bake
- Cuisine: American


