Why You’ll Love This Recipe
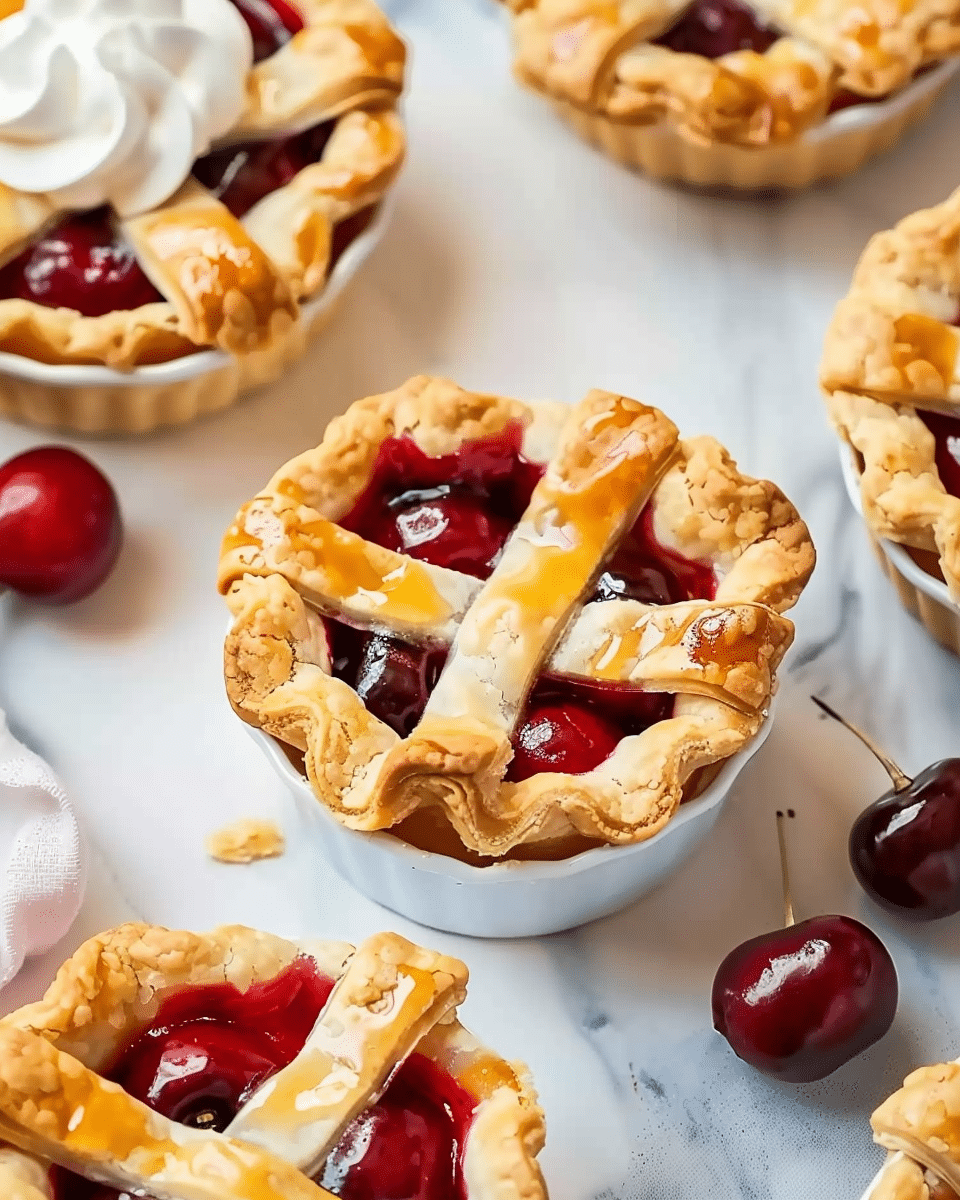
Mini Cherry Pies are a fun and adorable twist on the classic cherry pie, making them ideal for parties, potlucks, or even as a personal treat. The flaky, golden crust holds a luscious cherry filling made from fresh or frozen cherries, sugar, and a hint of lemon. These mini pies are easy to make and even easier to eat—no slicing needed! Whether you’re serving them at a gathering or enjoying them on your own, these mini cherry pies are sure to satisfy your sweet tooth and become a favorite dessert.
Ingredients
For the crust:
- 2 1/2 cups all-purpose flour
- 1 teaspoon sugar
- 1 teaspoon salt
- 1 cup unsalted butter, cold and cubed
- 6-8 tablespoons ice water
For the filling:
- 3 cups fresh or frozen cherries (pitted)
- 1/2 cup granulated sugar
- 1 tablespoon lemon juice
- 1 tablespoon cornstarch
- 1/4 teaspoon vanilla extract
- 1 tablespoon butter (optional, for richness)
For the egg wash:
- 1 egg, beaten
- 1 tablespoon water
(Tip: You’ll find the full list of ingredients and measurements in the recipe card below.)
Directions
- Make the pie crust:
- In a large mixing bowl, combine the flour, sugar, and salt. Add the cold, cubed butter and cut it into the dry ingredients using a pastry cutter or your fingers until the mixture resembles coarse crumbs.
- Gradually add ice water, 1 tablespoon at a time, mixing until the dough starts to come together. Add just enough water to form a dough—do not overwork it.
- Turn the dough out onto a floured surface and divide it into two halves. Shape each into a disk, wrap in plastic wrap, and refrigerate for at least 30 minutes.
- Prepare the cherry filling:
- In a medium saucepan, combine the cherries, sugar, lemon juice, cornstarch, and vanilla extract. Cook over medium heat, stirring constantly, until the mixture begins to thicken and bubble (about 5-7 minutes).
- Once thickened, remove from heat and stir in the butter (if using) for extra richness. Let the filling cool to room temperature while you roll out the dough.
- Assemble the mini pies:
- Preheat your oven to 375°F (190°C). Grease a muffin tin or mini tart pans.
- Roll out one disk of dough on a floured surface to about 1/8-inch thickness. Using a round cutter or the rim of a glass, cut out circles of dough large enough to fit into the muffin tin.
- Gently press the dough circles into the muffin tin cups, making sure to line the bottoms and sides.
- Spoon about 2 tablespoons of the cooled cherry filling into each crust.
- Roll out the second disk of dough and cut it into strips or circles to create the top crust. You can either use a lattice pattern or cover each pie with a full circle of dough.
- If using full circles for the top, make a few slits in the dough to allow steam to escape during baking.
- Add the egg wash:
- Brush the tops of the mini pies with the beaten egg wash, which will give them a golden, shiny finish as they bake.
- Bake:
- Bake the pies in the preheated oven for 20-25 minutes or until the crust is golden brown and the filling is bubbling. Keep an eye on them to ensure they don’t over-brown. You can cover the edges with aluminum foil if they’re getting too dark.
- Cool and serve:
- Let the mini cherry pies cool in the muffin tin for about 10 minutes, then transfer them to a wire rack to cool completely. Serve warm or at room temperature.
Servings and Timing
This recipe makes about 12 mini cherry pies, depending on the size of your muffin tin or tart pans. The preparation time is approximately 45 minutes, with about 20-25 minutes of baking time. Allow for cooling time of about 10-15 minutes after baking.
Variations
- Different Fruits: You can swap the cherries for other fruits like blueberries, raspberries, or mixed berries for a different twist on the mini pies.
- Almond Extract: Add a few drops of almond extract to the filling for an extra layer of flavor that pairs beautifully with cherries.
- Crumb Topping: Instead of a traditional pie crust, top the mini pies with a crumb topping made from butter, flour, sugar, and oats for a streusel effect.
- Mini Lattice Pies: Create a lattice top for each pie by weaving dough strips over the filling for a more traditional pie look.
Storage/Reheating
Store leftover mini cherry pies in an airtight container at room temperature for up to 2 days. They can also be stored in the refrigerator for up to 4 days if you prefer them chilled. To reheat, place them in a preheated oven at 350°F (175°C) for 5-7 minutes or until the crust is warm and crisp again.
FAQs
Can I use frozen cherries for this recipe?
Yes, you can use frozen cherries. Just be sure to thaw them and drain off any excess liquid before using them in the filling.
Can I make these mini pies in advance?
Yes! You can prepare the pies in advance and store them in the fridge before baking. Just bake them just before you’re ready to serve them for the freshest flavor.
Can I freeze these mini pies?
Yes, you can freeze the unbaked mini pies. After assembling, place them on a baking sheet in the freezer until frozen solid, then transfer them to an airtight container or freezer bag. Bake from frozen at 375°F (190°C) for about 25-30 minutes.
Can I make the crust ahead of time?
Yes, you can make the pie crust ahead of time. Simply prepare the dough, wrap it tightly, and refrigerate for up to 2 days. You can also freeze the dough for up to 2 months.
How do I prevent the bottom crust from getting soggy?
To prevent a soggy crust, be sure to bake the pies until the crust is golden and fully set. You can also brush the bottom of the crust with a thin layer of egg wash before filling it, which helps seal it and prevent it from becoming soggy.
Can I add a lattice top to these pies?
Absolutely! If you prefer a lattice crust, simply cut the top dough into strips and weave them over the filling, then brush with egg wash.
Can I use a store-bought crust for this recipe?
Yes, store-bought pie crusts are a convenient option. Just make sure to adjust the size to fit your mini pie pans or muffin tin.
Conclusion
Mini Cherry Pies are a delicious and adorable dessert that packs all the flavor of a traditional cherry pie into bite-sized portions. The buttery, flaky crust and sweet, tangy cherry filling make these mini pies perfect for any occasion. Whether you’re serving them at a party or enjoying them as a personal treat, these mini cherry pies are sure to delight anyone with a sweet tooth! Enjoy them warm with a scoop of ice cream or on their own for the perfect bite-sized dessert.
Print
Mini Cherry Pies
- Total Time: 1 hour
- Yield: 12 mini cherry pies
- Diet: Vegetarian
Description
Mini Cherry Pies are a fun, bite-sized version of the classic cherry pie. With a buttery, flaky crust and a rich, sweet cherry filling, these individual pies are perfect for any occasion and are sure to satisfy your sweet tooth.
Ingredients
- 2 1/2 cups all-purpose flour
- 1 teaspoon sugar
- 1 teaspoon salt
- 1 cup unsalted butter, cold and cubed
- 6-8 tablespoons ice water
- 3 cups fresh or frozen cherries (pitted)
- 1/2 cup granulated sugar
- 1 tablespoon lemon juice
- 1 tablespoon cornstarch
- 1/4 teaspoon vanilla extract
- 1 tablespoon butter (optional, for richness)
- 1 egg, beaten
- 1 tablespoon water
Instructions
Make the pie crust: In a large mixing bowl, combine the flour, sugar, and salt. Add the cold, cubed butter and cut it into the dry ingredients using a pastry cutter or your fingers until the mixture resembles coarse crumbs. Gradually add ice water, 1 tablespoon at a time, mixing until the dough starts to come together. Add just enough water to form a dough—do not overwork it. Turn the dough out onto a floured surface, divide into two halves, and shape each into a disk. Wrap in plastic wrap and refrigerate for at least 30 minutes.
- Prepare the cherry filling: In a medium saucepan, combine the cherries, sugar, lemon juice, cornstarch, and vanilla extract. Cook over medium heat, stirring constantly, until the mixture thickens and bubbles (about 5-7 minutes). Once thickened, remove from heat and stir in the butter (if using). Let the filling cool to room temperature while you roll out the dough.
- Assemble the mini pies: Preheat your oven to 375°F (190°C). Grease a muffin tin or mini tart pans. Roll out one disk of dough on a floured surface to about 1/8-inch thickness. Cut out circles of dough large enough to fit into the muffin tin. Press the dough circles into the muffin tin cups, making sure to line the bottoms and sides. Spoon about 2 tablespoons of the cooled cherry filling into each crust. Roll out the second disk of dough and cut it into strips or circles to create the top crust. You can use a lattice pattern or cover each pie with a full circle of dough. If using full circles, make a few slits in the dough to allow steam to escape.
- Add the egg wash: Brush the tops of the mini pies with the beaten egg wash for a golden, shiny finish as they bake.
- Bake: Bake the pies in the preheated oven for 20-25 minutes or until the crust is golden brown and the filling is bubbling. Keep an eye on them to ensure they don’t over-brown. You can cover the edges with aluminum foil if they’re getting too dark.
- Cool and serve: Let the mini cherry pies cool in the muffin tin for about 10 minutes, then transfer them to a wire rack to cool completely. Serve warm or at room temperature.
Notes
- If using frozen cherries, thaw and drain them well to avoid excess liquid in the filling.
- For a different flavor, you can add a few drops of almond extract to the filling to enhance the cherry taste.
- For a crunchier topping, consider adding a crumb topping instead of a full crust.
- These pies are best served fresh, but they can be stored in an airtight container at room temperature for up to 2 days or in the refrigerator for up to 4 days.
- Prep Time: 45 minutes
- Cook Time: 20-25 minutes
- Category: Dessert
- Method: Baking
- Cuisine: American
Nutrition
- Serving Size: 1 mini pie
- Calories: 220
- Sugar: 18g
- Sodium: 150mg
- Fat: 11g
- Saturated Fat: 7g
- Unsaturated Fat: 3g
- Trans Fat: 0g
- Carbohydrates: 29g
- Fiber: 2g
- Protein: 2g
- Cholesterol: 30mg


