Why You’ll Love This Recipe
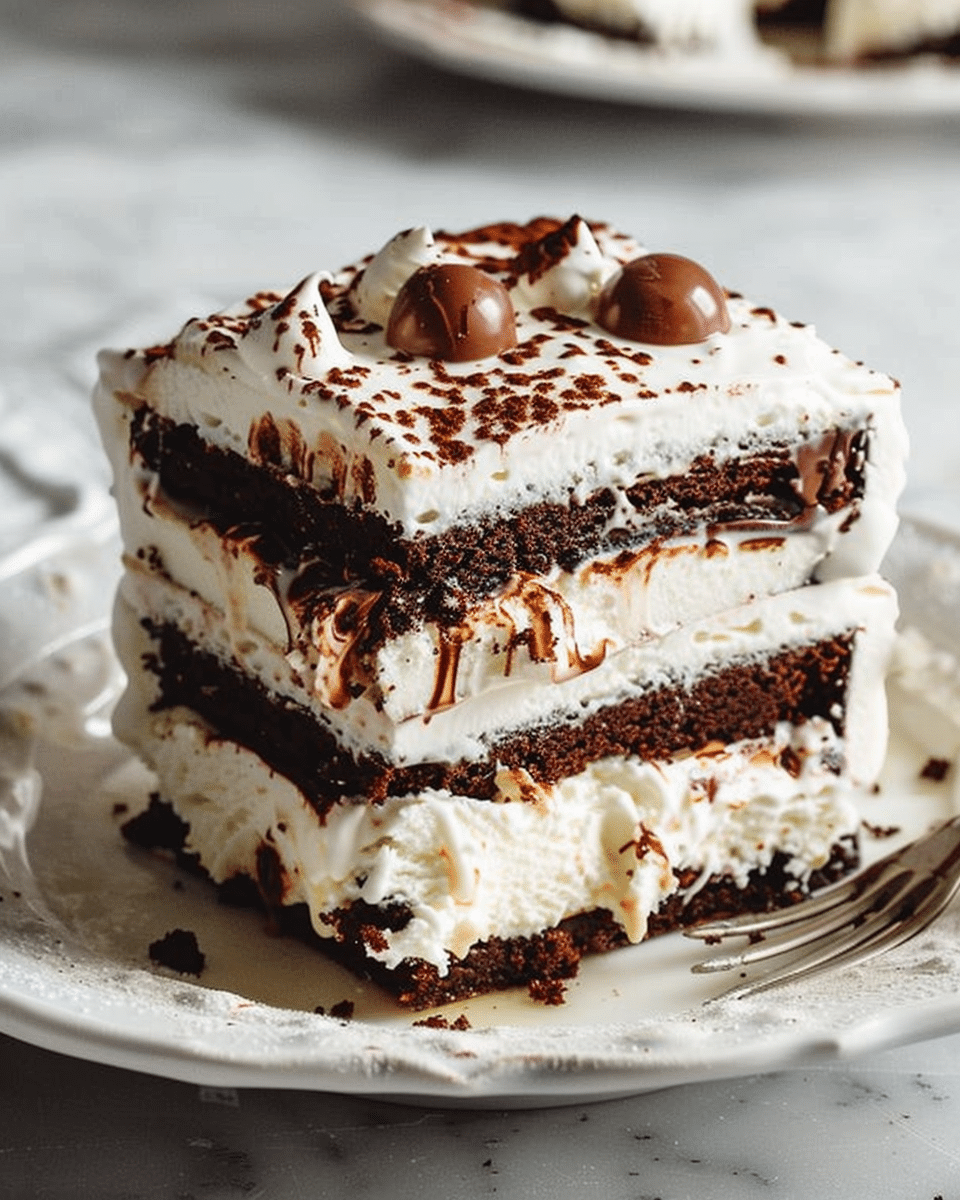
Ice Cream Sandwich Cake is the perfect combination of ice cream and cookies, all assembled into a decadent, layered dessert. It’s super simple to make—no baking required—and the result is a cool, creamy treat that everyone will love. You can customize it with your favorite flavors of ice cream and cookies, making it endlessly adaptable. Whether it’s a birthday celebration, summer barbecue, or casual get-together, this dessert will be the centerpiece of any occasion. Plus, it can be made ahead, which means you can spend less time in the kitchen and more time enjoying your event.
Ingredients
-
12 ice cream sandwiches (vanilla, chocolate, or your choice of flavor)
-
2 cups whipped cream or whipped topping (like Cool Whip)
-
1/4 cup hot fudge sauce (optional)
-
1/4 cup caramel sauce (optional)
-
1/2 cup crushed Oreos or other cookies (for topping)
-
Chocolate chips or sprinkles for garnish (optional)
(Tip: You’ll find the full list of ingredients and measurements in the recipe card below.)
Directions
-
Prepare the base layer: Lay 6 ice cream sandwiches in the bottom of a 9×13-inch baking dish, side by side. Make sure the sandwiches fit snugly to form a complete layer.
-
Spread the whipped cream: Spread half of the whipped cream or whipped topping evenly over the ice cream sandwiches.
-
Add toppings: Drizzle the hot fudge sauce and caramel sauce over the whipped cream layer for extra flavor (optional). You can also sprinkle a bit of crushed cookies, chocolate chips, or sprinkles at this point to add texture and flavor.
-
Repeat the layers: Lay the remaining 6 ice cream sandwiches on top of the whipped cream layer. Spread the remaining whipped cream on top, smoothing it out with a spatula.
-
Add final toppings: Finish the dessert by sprinkling the top with crushed Oreos, chocolate chips, or sprinkles. If you like, you can drizzle more hot fudge and caramel sauce for a finishing touch.
-
Chill the cake: Cover the dish with plastic wrap and freeze the cake for at least 4 hours or overnight until it is firm and set.
-
Serve: When ready to serve, slice the cake into squares, and enjoy this cool, creamy dessert!
Servings and Timing
-
Servings: This recipe makes about 12 servings, depending on the size of your slices.
-
Prep Time: 15 minutes
-
Chill Time: 4 hours
-
Total Time: 4 hours 15 minutes
Variations
-
Flavor Combinations: Use different flavored ice cream sandwiches like chocolate, mint, or even peanut butter for a fun twist. You can also use flavored whipped topping like chocolate or marshmallow fluff.
-
Add Fruit: Add layers of fresh fruit like strawberries, raspberries, or banana slices between the layers for a refreshing fruity twist.
-
Different Cookies: Switch up the crushed cookies on top. Oreos are a classic choice, but you can also use graham crackers, Nilla wafers, or even crushed peanut butter cups.
-
Vegan or Dairy-Free Option: Use dairy-free ice cream sandwiches and whipped topping for a vegan or dairy-free version of this treat.
Storage/Reheating
-
Storage: Store leftover cake in the freezer in an airtight container or wrapped tightly with plastic wrap for up to 5-7 days. This dessert is best enjoyed while frozen.
-
Reheating: This cake is meant to be served frozen, so there’s no need to reheat it. Just remove from the freezer, slice, and serve!
FAQs
1. Can I use homemade ice cream sandwiches?
Yes! If you prefer, you can use homemade ice cream sandwiches or even make your own by layering your favorite cookies with ice cream. Just make sure they fit well into the baking dish.
2. Can I use other types of whipped cream?
If you prefer, you can use fresh whipped cream made from heavy cream and powdered sugar instead of store-bought whipped topping. The homemade version will give the cake a slightly richer flavor.
3. Can I make this dessert ahead of time?
Yes! In fact, it’s best to prepare this cake ahead of time so it has time to freeze and set. You can make it a day or two in advance and keep it frozen until ready to serve.
4. Can I use a different type of cookie for the topping?
Absolutely! You can use any type of cookie or candy you prefer, such as crushed graham crackers, Nilla wafers, M&Ms, or even crushed pretzels for a sweet and salty flavor.
5. Can I use store-bought hot fudge or caramel sauce?
Yes, you can use store-bought hot fudge and caramel sauces, which are convenient and delicious. You can also make your own if you prefer homemade versions.
6. Can I use a different size pan?
This recipe works best in a 9×13-inch pan, but you can adapt it for a smaller or larger pan by adjusting the number of ice cream sandwiches and whipped topping layers. Just make sure the layers are evenly spread.
7. Can I add a layer of peanut butter?
Yes! For a peanut butter twist, spread a layer of creamy peanut butter between the layers of ice cream sandwiches, or drizzle it over the top of the whipped cream layer for added flavor.
8. Can I freeze this cake for longer than a few days?
You can store the cake in the freezer for up to a week, but it’s best when eaten within a few days to keep the ice cream sandwiches at their freshest texture.
9. Can I use other toppings besides crushed cookies?
Definitely! You can use crushed candy bars, sprinkles, nuts, or even crushed pretzels for a salty-sweet topping.
10. Can I use any flavor of ice cream sandwiches?
Yes! This cake is versatile, so feel free to use any flavor of ice cream sandwiches you like. Chocolate, vanilla, or even mint chocolate chip would all work wonderfully in this dessert.
Conclusion
This Ice Cream Sandwich Cake is the ultimate summer dessert: fun, easy to make, and oh-so-delicious. With layers of ice cream sandwiches, whipped cream, and tasty toppings, it’s a dessert everyone will love. Whether you’re hosting a party, a casual get-together, or just want a sweet treat on a hot day, this cake is the perfect solution. Best of all, you can make it ahead of time, so you can spend more time enjoying your guests and less time in the kitchen!
Ice Cream Sandwich Cake
5 Stars 4 Stars 3 Stars 2 Stars 1 Star
No reviews
- Author: Ava
- Total Time: 4 hours 15 minutes
- Yield: 12 servings
- Diet: Gluten Free
Description
A fun, no-bake Ice Cream Sandwich Cake with layers of ice cream sandwiches, whipped cream, and delicious toppings, perfect for any occasion.
Ingredients
- 12 ice cream sandwiches (vanilla, chocolate, or your choice of flavor)
2 cups whipped cream or whipped topping (like Cool Whip)
1/4 cup hot fudge sauce (optional)
1/4 cup caramel sauce (optional)
1/2 cup crushed Oreos or other cookies (for topping)
Chocolate chips or sprinkles for garnish (optional)
Instructions
Prepare the base layer: Lay 6 ice cream sandwiches in the bottom of a 9×13-inch baking dish, side by side. Make sure the sandwiches fit snugly to form a complete layer.
- Spread the whipped cream: Spread half of the whipped cream or whipped topping evenly over the ice cream sandwiches.
- Add toppings: Drizzle the hot fudge sauce and caramel sauce over the whipped cream layer for extra flavor (optional). You can also sprinkle a bit of crushed cookies, chocolate chips, or sprinkles at this point to add texture and flavor.
- Repeat the layers: Lay the remaining 6 ice cream sandwiches on top of the whipped cream layer. Spread the remaining whipped cream on top, smoothing it out with a spatula.
- Add final toppings: Finish the dessert by sprinkling the top with crushed Oreos, chocolate chips, or sprinkles. If you like, you can drizzle more hot fudge and caramel sauce for a finishing touch.
- Chill the cake: Cover the dish with plastic wrap and freeze the cake for at least 4 hours or overnight until it is firm and set.
- Serve: When ready to serve, slice the cake into squares, and enjoy this cool, creamy dessert!
Notes
- This cake can be made ahead and stored in the freezer until you’re ready to serve.
- Feel free to add fruit like sliced strawberries or bananas for a refreshing twist.
- For a nutty topping, consider adding chopped nuts or crushed candy bars.
- If you prefer a peanut butter twist, spread peanut butter between the layers of ice cream sandwiches or drizzle it over the whipped cream.
- Prep Time: 15 minutes
- Cook Time: 0 minutes
- Category: Dessert
- Method: No-bake
- Cuisine: American
Nutrition
- Serving Size: 1 slice
- Calories: 300
- Sugar: 25g
- Sodium: 120mg
- Fat: 20g
- Saturated Fat: 12g
- Unsaturated Fat: 6g
- Trans Fat: 0g
- Carbohydrates: 30g
- Fiber: 2g
- Protein: 3g
- Cholesterol: 40mg


