Why You’ll Love This Recipe
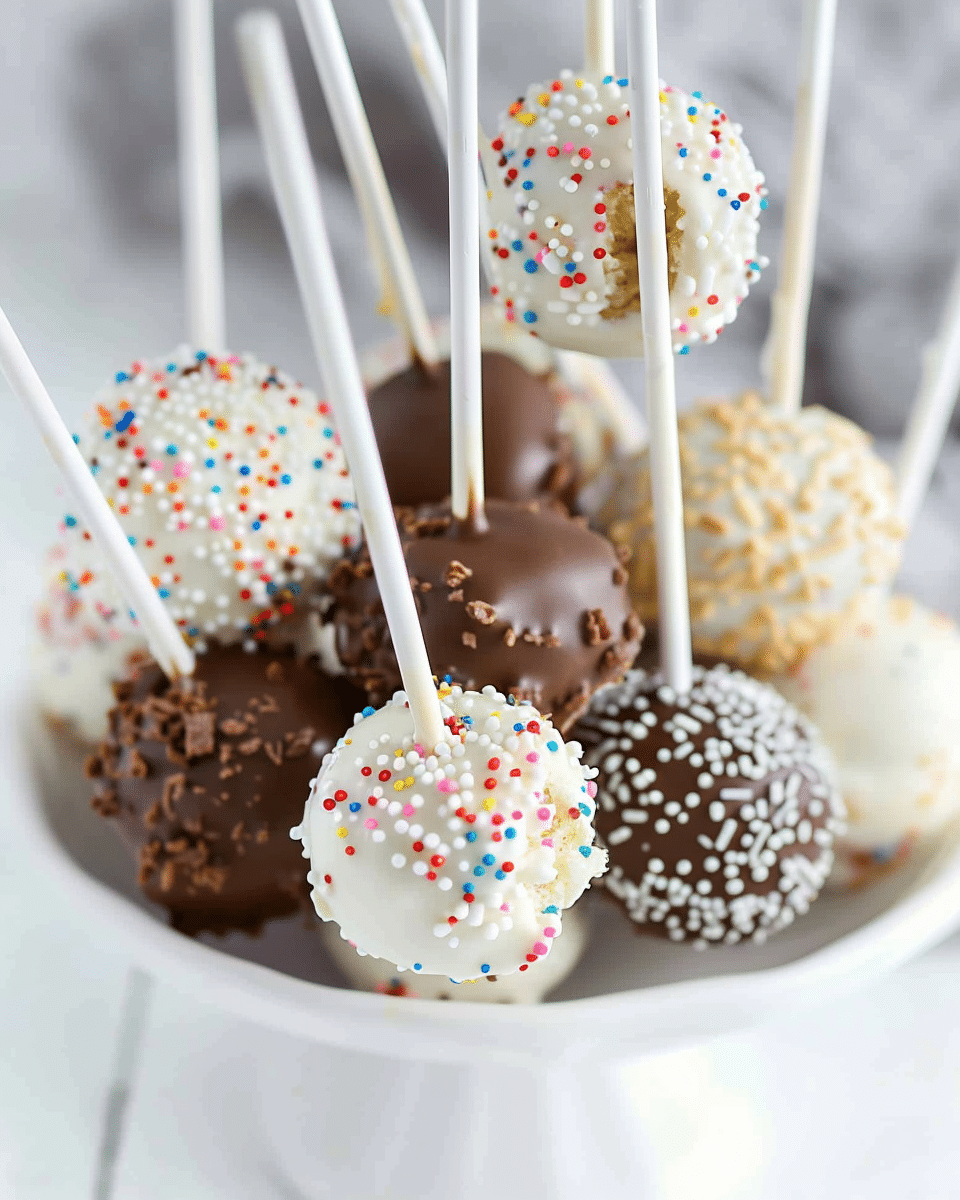
These Easy No-Bake Cake Pops are incredibly simple to make, yet they are irresistibly delicious! The moist, sweet cake combined with creamy frosting creates a perfect bite-sized treat. You can customize them with your favorite cake flavors, frosting, and chocolate coatings. They are also fun to decorate, so you can get creative with sprinkles, drizzles, or other toppings. If you want a treat that’s easy to prepare, fun to eat, and perfect for any occasion, these cake pops are the way to go!
Ingredients
- 1 store-bought or homemade cake (any flavor, baked and cooled)
- 1/2 cup frosting (store-bought or homemade)
- 1 cup chocolate chips (for coating, dark, milk, or white)
- Sprinkles or other decorations (optional)
- Lollipop sticks (or wooden skewers)
(Tip: You’ll find the full list of ingredients and measurements in the recipe card below.)
Directions
- Prepare the Cake: If you’re using a store-bought cake, follow the instructions on the box to bake and cool the cake. If using homemade cake, ensure it is fully cooled before starting.
- Crumble the Cake: Once the cake has cooled, crumble it into small pieces using your hands or a fork. The goal is to break it down into fine crumbs, almost to a powder-like texture.
- Mix with Frosting: Add about 1/2 cup of frosting to the crumbled cake and mix well until the mixture becomes sticky and holds together. You may need to adjust the amount of frosting depending on the consistency. The mixture should be moist but not overly wet.
- Form the Cake Pops: Take a small amount of the cake mixture and roll it into a ball, about 1 inch in diameter. You should be able to make about 20-25 cake pops depending on the size.
- Insert the Sticks: Melt a small amount of chocolate (from the 1 cup of chocolate chips) and dip the end of each lollipop stick into the melted chocolate before inserting it into the center of each cake ball. This helps the stick stay in place. Then, carefully insert the stick into each cake pop, being careful not to push all the way through.
- Coat the Cake Pops: Melt the remaining chocolate chips in a microwave-safe bowl, stirring every 20-30 seconds until smooth. Dip each cake pop into the melted chocolate, coating it evenly. Tap the stick gently to remove any excess chocolate.
- Decorate (Optional): If desired, decorate your cake pops with sprinkles, colored sugar, or melted white chocolate for extra flair. Be sure to do this while the chocolate coating is still wet so the decorations stick.
- Chill to Set: Place the decorated cake pops on a parchment-lined tray and refrigerate for about 15-20 minutes or until the chocolate coating is set and firm.
- Serve and Enjoy: Once the cake pops are fully set, they are ready to serve! Enjoy these bite-sized treats with friends and family.
Servings and Timing
This recipe makes about 20-25 cake pops, depending on the size.
- Preparation time: 20 minutes
- Chilling time: 15-20 minutes
- Total time: 40-45 minutes
Variations
- Flavor Variations: You can use any flavor of cake and frosting you like. Vanilla, chocolate, red velvet, or even carrot cake work great for cake pops.
- Coating Options: Instead of chocolate, you can coat the cake pops in candy melts, which come in a variety of colors, or even a mixture of white and dark chocolate for a two-tone effect.
- Add-Ins: Mix in some mini chocolate chips, crushed candy, or sprinkles into the cake mixture for extra texture and flavor.
- Vegan Version: Use a vegan cake mix and frosting, and dip the cake pops in dairy-free chocolate for a vegan-friendly treat.
Storage/Reheating
Store leftover cake pops in an airtight container in the refrigerator for up to a week. They are best served cold or at room temperature, so take them out of the fridge for a few minutes before serving. Cake pops can also be frozen for up to 3 months. To freeze, place them in a single layer on a baking sheet and freeze until solid before transferring them to a freezer-safe container.
FAQs
Can I use store-bought cake mix for this recipe?
Yes! Using a store-bought cake mix is a great shortcut. Just bake the cake according to the package instructions, and you’re ready to go.
Can I use frosting from a can?
Yes, store-bought frosting works perfectly in this recipe. It’s an easy way to save time, but homemade frosting can also add a richer flavor.
Can I make cake pops without sticks?
Yes, you can make cake balls without sticks if you prefer. Just skip the step of inserting the sticks and serve them as bite-sized cake balls.
How do I keep the chocolate coating smooth?
Make sure to melt the chocolate chips slowly, either in a microwave or over a double boiler, stirring frequently. Adding a teaspoon of vegetable oil or coconut oil to the chocolate helps it coat the cake pops smoothly.
How can I make these cake pops more colorful?
You can dip the cake pops in different colored candy melts or sprinkle them with colored sugars or nonpareils to give them a fun and vibrant look.
Can I freeze the cake pops before coating them?
Yes, you can freeze the uncoated cake pops for up to 3 months. Just ensure they are frozen solid before dipping in the chocolate.
How do I prevent the cake pops from falling off the sticks?
Make sure to dip the stick in melted chocolate before inserting it into the cake ball. This helps the stick adhere better to the cake and prevents it from falling out.
Can I use other types of chocolate for coating?
Absolutely! You can use milk, white, or dark chocolate for coating, depending on your taste preferences. You can also mix different types of chocolate for a marbled effect.
Can I decorate the cake pops with something other than sprinkles?
Yes! You can use crushed nuts, colored sugars, or edible glitter for a different look. You can also drizzle extra melted chocolate over them for an elegant finish.
Can I make cake pops in advance?
Yes, cake pops can be made ahead of time and stored in the fridge or freezer. They are perfect for prepping in advance for parties or gatherings.
Conclusion
Easy No-Bake Cake Pops are a delicious, fun treat that are perfect for any occasion. With endless flavor and decoration possibilities, you can make these little treats your own. Whether you’re making them for a birthday, holiday, or just for fun, they are sure to be a hit with everyone. The best part? No baking required! Whip up a batch of these irresistible cake pops and enjoy a sweet, bite-sized dessert that’s as fun to make as it is to eat.
Print
Easy No-Bake Cake Pops Recipe
- Total Time: 40-45 minutes
- Yield: 20-25 cake pops
- Diet: Vegetarian
Description
Easy No-Bake Cake Pops are a fun, bite-sized treat made by combining crumbled cake with frosting, coating them in chocolate, and decorating them with sprinkles or other toppings.
Ingredients
- 1 store-bought or homemade cake (any flavor, baked and cooled)
- 1/2 cup frosting (store-bought or homemade)
- 1 cup chocolate chips (for coating, dark, milk, or white)
- Sprinkles or other decorations (optional)
- Lollipop sticks (or wooden skewers)
Instructions
Prepare the Cake: If using store-bought cake, follow the package instructions to bake and cool. For homemade cake, ensure it is completely cooled.
- Crumble the Cake: Crumble the cooled cake into small pieces with your hands or a fork until it resembles fine crumbs.
- Mix with Frosting: Add 1/2 cup of frosting to the crumbled cake and mix well until the mixture becomes sticky but not overly wet.
- Form the Cake Pops: Roll the cake mixture into 1-inch balls, making 20-25 cake pops depending on size.
- Insert the Sticks: Melt a small amount of chocolate and dip the ends of the sticks into it before inserting them into the center of each cake ball. This helps the sticks stay in place.
- Coat the Cake Pops: Melt the remaining chocolate chips and dip each cake pop into the melted chocolate, tapping off excess chocolate.
- Decorate (Optional): While the chocolate is still wet, decorate with sprinkles, colored sugar, or drizzle with additional melted chocolate.
- Chill to Set: Place the cake pops on a parchment-lined tray and refrigerate for 15-20 minutes to set the chocolate coating.
- Serve and Enjoy: Once the chocolate is firm, serve and enjoy your cake pops!
Notes
- You can make cake balls without sticks if you prefer. Just skip inserting the sticks.
- For added richness, consider mixing mini chocolate chips, crushed candy, or sprinkles into the cake mixture.
- If you want a more colorful look, use candy melts in various colors instead of chocolate.
- Prep Time: 20 minutes
- Cook Time: undefined
- Category: Dessert
- Method: No-bake
- Cuisine: American
Nutrition
- Serving Size: 1 cake pop
- Calories: 150
- Sugar: 12g
- Sodium: 60mg
- Fat: 9g
- Saturated Fat: 5g
- Unsaturated Fat: 3g
- Trans Fat: 0g
- Carbohydrates: 16g
- Fiber: 1g
- Protein: 2g
- Cholesterol: 20mg


