Why You’ll Love This Recipe
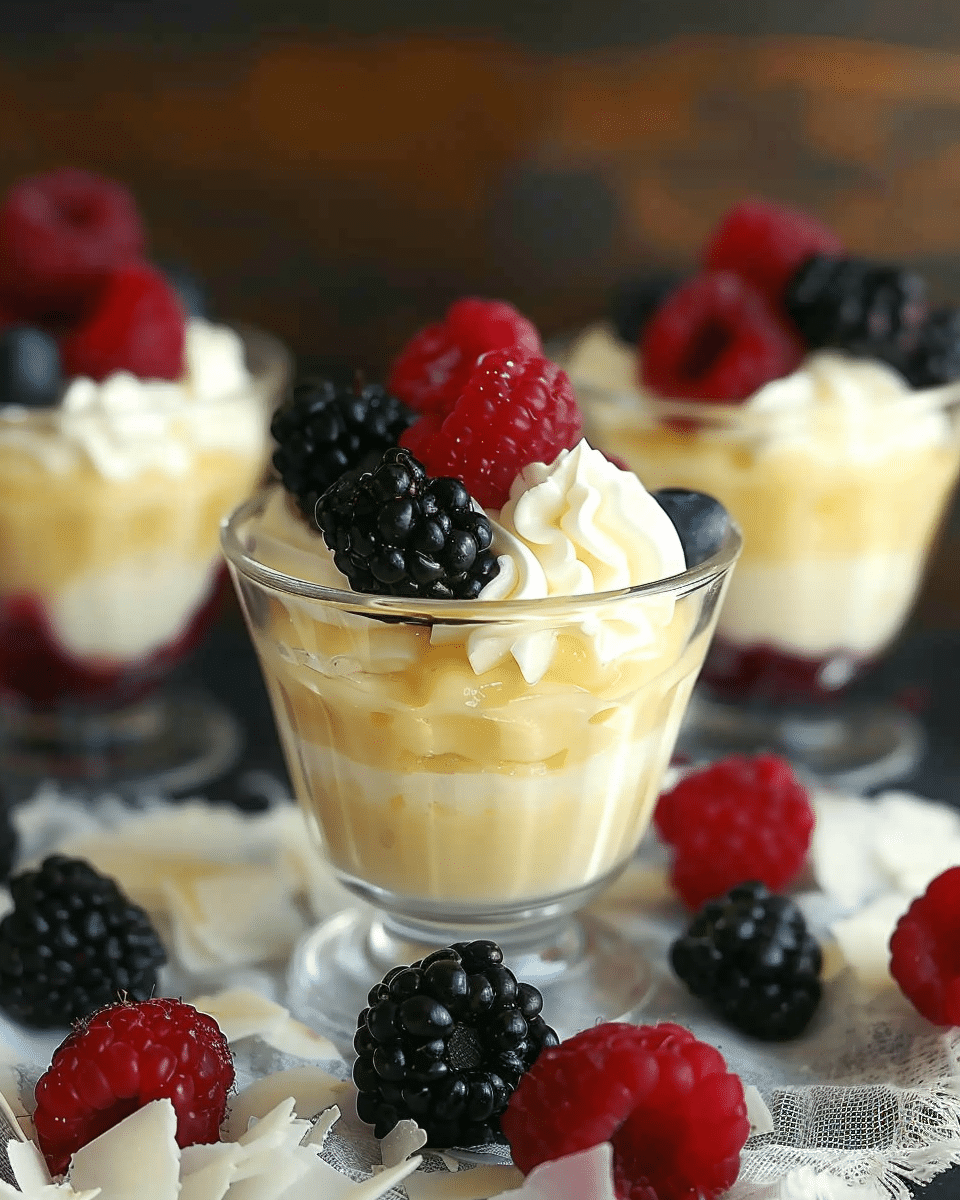
Berry Vanilla Pudding Cups are a quick and easy dessert that’s not only delicious but also visually appealing. The creamy vanilla pudding is made from scratch and can be prepared in advance, making it an ideal option for busy days or when you want a stress-free treat. The fresh berries add a burst of color and natural sweetness, creating the perfect contrast to the richness of the pudding. Whether you’re looking for something light, fruity, or indulgent, this dessert is versatile enough to suit any occasion!
Ingredients
For the Vanilla Pudding:
- 2 cups whole milk (or any milk of your choice)
- 1/2 cup granulated sugar
- 2 tablespoons cornstarch
- 1/4 teaspoon salt
- 1 teaspoon vanilla extract
- 2 large egg yolks
- 2 tablespoons unsalted butter
For the Berry Layer:
- 1 1/2 cups mixed fresh berries (such as strawberries, blueberries, raspberries, or blackberries)
- 1 tablespoon honey or maple syrup (optional, depending on desired sweetness)
For Topping:
- Whipped cream (optional)
- Crushed granola or cookie crumbs (optional)
(Tip: You’ll find the full list of ingredients and measurements in the recipe card below.)
Directions
- Prepare the Vanilla Pudding: In a medium saucepan, combine the milk, sugar, cornstarch, and salt. Whisk together to combine and heat the mixture over medium heat, stirring constantly.
- Temper the Egg Yolks: In a separate bowl, whisk the egg yolks. Once the milk mixture is hot but not boiling, slowly pour a small amount of the hot milk mixture into the egg yolks, whisking constantly to temper the eggs. Gradually pour the egg mixture back into the saucepan while whisking.
- Cook the Pudding: Continue to cook the mixture over medium heat, stirring constantly, until it thickens and begins to boil. Once it thickens, cook for an additional 1-2 minutes. Remove from the heat and stir in the vanilla extract and butter until smooth.
- Cool the Pudding: Pour the pudding into a bowl and cover the surface with plastic wrap to prevent a skin from forming. Allow it to cool at room temperature for 15 minutes, then refrigerate for at least 1 hour to fully set and chill.
- Prepare the Berry Layer: While the pudding cools, wash and prepare the berries. If you’d like, toss the berries with honey or maple syrup to add extra sweetness.
- Assemble the Pudding Cups: Once the pudding is chilled, spoon it into individual serving cups. Layer the berries on top of the pudding, dividing them evenly among the cups.
- Add Toppings: Optionally, top with whipped cream and a sprinkle of granola or crushed cookies for some added texture and flavor.
- Serve: Serve immediately or store in the refrigerator for up to 2 days.
Servings and Timing
- Servings: 4-6 pudding cups
- Prep time: 20 minutes
- Cook time: 10 minutes
- Chill time: 1 hour
- Total time: 1 hour 30 minutes
Variations
- Make It Vegan: Use plant-based milk (such as almond, coconut, or oat milk) and replace the eggs with a vegan egg replacer, such as cornstarch or agar agar. Use dairy-free butter for a vegan-friendly version.
- Add Chocolate: For a chocolate twist, make chocolate pudding by adding 1/4 cup of cocoa powder to the dry ingredients before cooking. Top with berries and whipped cream for a chocolate-berry combo.
- Use Other Fruits: If you prefer other fruits, try layering sliced bananas, kiwi, or mango instead of berries. These fruits will complement the vanilla pudding beautifully.
- Add a Crunch: Mix crushed graham crackers, cookies, or granola into the pudding for an added crunch, or use it as a topping.
- Make a Custard: To make a richer, custard-like pudding, you can add 1/4 cup of heavy cream to the milk mixture.
Storage/Reheating
- Storage: Store the pudding cups in an airtight container in the refrigerator for up to 2 days. Add the berries just before serving to keep them fresh.
- Freezing: You can freeze the pudding cups, but the texture may change slightly after thawing. Freeze without the fruit and toppings, and add them after thawing for the best texture.
- Reheating: If you prefer your pudding warm, you can gently reheat it on the stovetop over low heat, stirring occasionally. Be careful not to overheat it, as it may affect the texture.
FAQs
Can I use dairy-free milk for the pudding?
Yes, you can substitute any dairy-free milk, such as almond milk, coconut milk, or oat milk, to make this recipe dairy-free.
Can I use frozen berries instead of fresh?
Yes, you can use frozen berries, but be sure to thaw and drain them before using to avoid excess moisture in the pudding cups.
How can I make the pudding thicker?
If the pudding is too runny, you can mix an additional tablespoon of cornstarch with a small amount of milk and stir it into the pudding while it’s cooking to help it thicken.
Can I make this pudding ahead of time?
Yes, the pudding can be made a day in advance. Simply store it in the refrigerator until ready to serve, and add the berries and toppings just before serving.
How do I prevent a skin from forming on the pudding?
To prevent a skin from forming on the pudding as it cools, press a piece of plastic wrap directly onto the surface of the pudding while it cools.
Can I use other types of fruit for the topping?
Yes, you can use a variety of fruits such as sliced bananas, kiwi, or citrus segments. Mix and match different fruits for a colorful and flavorful topping.
Can I make this pudding in a larger serving dish instead of individual cups?
Yes, you can make this pudding in a large dish or a bowl. Just layer the pudding and berries, and serve with a spoon.
Can I use a store-bought pudding mix?
If you’re short on time, you can use a store-bought vanilla pudding mix, but making the pudding from scratch will give it a creamier, richer flavor.
How can I make this recipe gluten-free?
The ingredients in this recipe are naturally gluten-free, but make sure your granola or any other toppings are gluten-free if you’re using them.
Conclusion
Berry Vanilla Pudding Cups are a delightful and versatile dessert that combines the creamy richness of homemade vanilla pudding with the fresh brightness of berries. Whether you serve them for a family gathering, a party, or as a simple treat, these pudding cups will be a hit with everyone. They’re easy to make, customizable with your favorite fruits and toppings, and perfect for any occasion. Light, refreshing, and full of flavor, Berry Vanilla Pudding Cups are the perfect way to indulge in a healthy, satisfying dessert!
Print
Berry Vanilla Pudding Cups
- Total Time: 1 hour 30 minutes
- Yield: 4-6 pudding cups
- Diet: Vegetarian
Description
Berry Vanilla Pudding Cups are a refreshing dessert featuring creamy vanilla pudding layered with fresh berries, offering a delightful contrast of textures and flavors.
Ingredients
- 2 cups whole milk (or any milk of your choice)
- 1/2 cup granulated sugar
- 2 tablespoons cornstarch
- 1/4 teaspoon salt
- 1 teaspoon vanilla extract
- 2 large egg yolks
- 2 tablespoons unsalted butter
- 1 1/2 cups mixed fresh berries (such as strawberries, blueberries, raspberries, or blackberries)
- 1 tablespoon honey or maple syrup (optional)
- Whipped cream (optional)
- Crushed granola or cookie crumbs (optional)
Instructions
In a medium saucepan, combine the milk, sugar, cornstarch, and salt. Whisk to combine and heat the mixture over medium heat, stirring constantly.
- In a separate bowl, whisk the egg yolks. Slowly pour a small amount of the hot milk mixture into the egg yolks, whisking constantly to temper the eggs. Gradually pour the egg mixture back into the saucepan while whisking.
- Continue cooking over medium heat, stirring constantly, until it thickens and begins to boil. Once thickened, cook for an additional 1-2 minutes. Remove from heat and stir in vanilla extract and butter until smooth.
- Pour the pudding into a bowl, cover with plastic wrap to prevent a skin, and let it cool at room temperature for 15 minutes. Refrigerate for at least 1 hour to fully set and chill.
- While the pudding cools, wash and prepare the berries. Toss them with honey or maple syrup if you prefer extra sweetness.
- Once the pudding is chilled, spoon it into individual cups. Layer the berries on top of the pudding, dividing them evenly among the cups.
- Optionally, top with whipped cream and granola or crushed cookies for extra texture and flavor.
- Serve immediately or store in the refrigerator for up to 2 days.
Notes
- For a vegan version, replace dairy milk with plant-based milk and substitute eggs with cornstarch or agar agar. Use dairy-free butter.
- Frozen berries can be used but should be thawed and drained to avoid excess moisture in the pudding cups.
- For a richer flavor, you can add a little vanilla bean paste or extra vanilla extract to the pudding mixture.
- To make the pudding thicker, add an additional tablespoon of cornstarch mixed with a small amount of milk while cooking.
- Prep Time: 20 minutes
- Cook Time: 10 minutes
- Category: Dessert
- Method: Cooking
- Cuisine: American
Nutrition
- Serving Size: 1 pudding cup
- Calories: 180
- Sugar: 18g
- Sodium: 65mg
- Fat: 8g
- Saturated Fat: 5g
- Unsaturated Fat: 2g
- Trans Fat: 0g
- Carbohydrates: 22g
- Fiber: 3g
- Protein: 3g
- Cholesterol: 110mg


