Why You’ll Love This Recipe
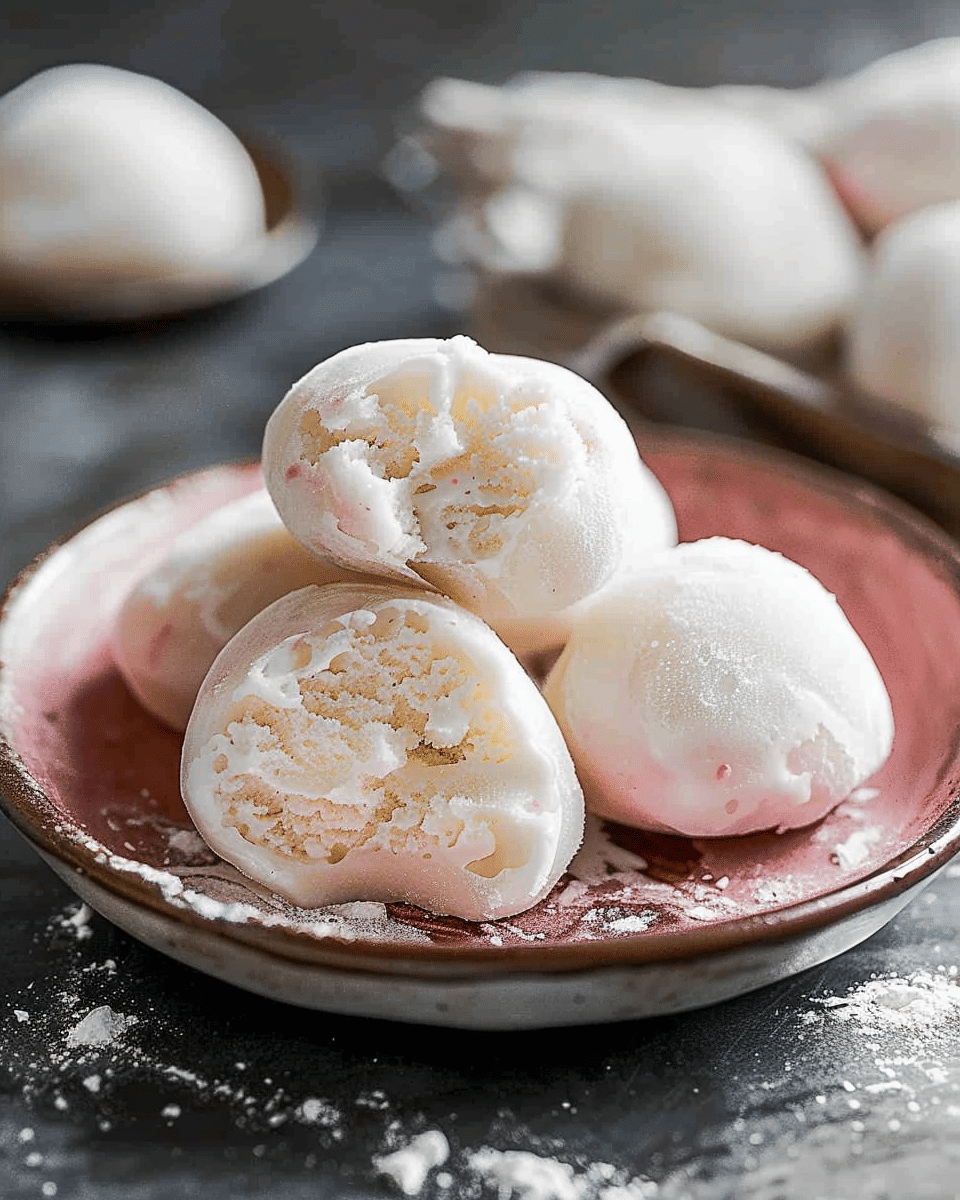
Mochi Ice Cream is a delightful combination of chewy and creamy, creating a mouthwatering balance of textures. The delicate mochi dough, made from glutinous rice flour, is slightly sweet and elastic, complementing the cool, refreshing ice cream inside. The bite-sized pieces are perfect for serving at parties, gatherings, or simply enjoying a delicious treat on your own. Plus, it’s highly customizable—choose your favorite ice cream flavor or get creative with different fillings to make this dessert your own!
Ingredients
For the mochi dough:
- 1 cup glutinous rice flour (also called sweet rice flour, available at Asian markets)
- ¼ cup granulated sugar
- 1 cup water
- Cornstarch (for dusting)
For the filling:
- 1 pint of ice cream (choose your favorite flavor such as vanilla, matcha, chocolate, or red bean)
(Tip: You’ll find the full list of ingredients and measurements in the recipe card below.)
Directions
Prepare the ice cream:
- Scoop the ice cream: Take the ice cream out of the freezer and let it soften slightly at room temperature for about 5-10 minutes to make scooping easier.
- Scoop and shape: Using a small ice cream scoop or spoon, scoop the ice cream into small balls (about 1 tablespoon each). Place the ice cream balls on a parchment-lined baking sheet or tray and freeze them for at least 1-2 hours to harden. This step is essential to ensure the ice cream stays firm inside the mochi dough.
Prepare the mochi dough:
- Mix the mochi dough: In a heatproof bowl, whisk together the glutinous rice flour, sugar, and water until smooth and free of lumps.
- Cook the dough: Microwave the mixture in 30-second intervals, stirring well between each interval, until the dough becomes thick and translucent (about 1.5 to 2 minutes total). Be careful not to overcook it, as it can become too sticky. Alternatively, you can cook the mixture over the stovetop in a double boiler, stirring constantly until thickened.
- Cool the dough: Allow the mochi dough to cool slightly until it is manageable, but still warm and pliable. If the dough becomes too sticky, dust your hands with cornstarch or use parchment paper to handle it more easily.
Assemble the Mochi Ice Cream:
- Dust your surface: On a clean surface, generously dust with cornstarch to prevent the mochi dough from sticking.
- Divide the dough: Divide the mochi dough into small portions (about 8-10 pieces). You can use your hands or a spoon to scoop them out.
- Flatten the dough: Using your fingers or a rolling pin, flatten each portion of dough into a round disc, roughly 3 inches in diameter. Be sure to keep the edges of the discs thinner than the center.
- Wrap the ice cream: Take a frozen ball of ice cream and place it in the center of the flattened mochi dough. Gently fold the edges of the dough up around the ice cream, pinching them together to seal the mochi. You may need to stretch the dough a little to cover the ice cream completely.
- Freeze: Once the mochi is sealed around the ice cream, place the finished mochis back on the parchment paper and freeze for at least 1 hour to firm up.
Serve:
- Once the mochi is firm and the ice cream is fully encased in the dough, serve immediately! Mochi Ice Cream is best enjoyed cold and fresh, but it can be stored in the freezer for up to 2 weeks.
Servings and Timing
- Servings: 6-8 mochis (depending on the size of your ice cream scoops)
- Preparation time: 20-30 minutes
- Freezing time: 1-2 hours (for ice cream balls and assembled mochis)
- Total time: 2-3 hours
Variations
- Flavored mochi dough: You can experiment with different flavors of the mochi dough by adding matcha powder, cocoa powder, or fruit puree to the dough mixture before cooking. This will give your mochi a unique twist.
- Vegan mochi ice cream: Make a dairy-free version by using vegan ice cream (coconut, almond, or soy-based) and substituting a plant-based sweetener like maple syrup or agave in the mochi dough.
- Fruit-filled mochis: Instead of using ice cream, you can fill the mochi with fresh fruit or a fruit-flavored sorbet for a lighter, fruitier variation.
- Chocolate-covered mochis: After assembling the mochis, dip them in melted chocolate for a decadent twist. Freeze them again to harden the chocolate.
Storage/Reheating
- Storage: Store Mochi Ice Cream in an airtight container in the freezer for up to 2 weeks. Keep them separated with parchment paper to prevent sticking.
- Reheating: Mochi Ice Cream should be eaten cold. Allow it to sit at room temperature for a few minutes to soften slightly before serving if needed.
FAQs
Can I use regular rice flour instead of glutinous rice flour?
No, regular rice flour won’t work for making mochi. You need glutinous rice flour (also known as sweet rice flour) to achieve the chewy and sticky texture that is characteristic of mochi.
Can I make Mochi Ice Cream without a scoop?
Yes! If you don’t have an ice cream scoop, you can simply spoon out the ice cream and roll it into small balls using your hands. Just be sure the ice cream is firm before attempting to handle it.
Can I use store-bought mochi dough?
Store-bought mochi dough is available in some Asian markets, but making it from scratch ensures that you can customize the flavor and consistency to your liking. However, using store-bought dough can save time and is a great shortcut.
How do I keep the mochi dough from sticking to my hands?
If the mochi dough is sticky, dust your hands with cornstarch to make it easier to handle. You can also use a piece of parchment paper to press and shape the dough without it sticking to your hands.
Can I make Mochi Ice Cream with different ice cream flavors?
Absolutely! Mochi Ice Cream is highly customizable. Feel free to experiment with any ice cream flavor you love, from traditional vanilla and chocolate to exotic options like mango, green tea, or red bean.
Conclusion
Mochi Ice Cream is a fun, unique, and delicious treat that combines the chewy texture of mochi with the refreshing creaminess of ice cream. Perfect for summer, parties, or any time you’re craving something sweet, this dessert will definitely impress your friends and family. With endless flavor possibilities and the ability to customize each bite, Mochi Ice Cream is a dessert that’s both playful and indulgent. Whether you’re making it for a special occasion or just as a fun weekend project, it’s a treat you won’t want to miss!
Print
Mochi Ice Cream: A Fun and Delicious Japanese Treat
- Total Time: 2-3 hours
- Yield: 6-8 mochis (depending on the size of ice cream scoops)
- Diet: Vegetarian
Description
Mochi Ice Cream is a delicious fusion of chewy Japanese mochi and creamy ice cream. The soft rice dough wraps around a scoop of your favorite ice cream flavor, creating a fun, indulgent treat that’s both chewy and creamy.
Ingredients
- 1 cup glutinous rice flour (sweet rice flour)
- ¼ cup granulated sugar
- 1 cup water
- Cornstarch (for dusting)
- 1 pint of ice cream (vanilla, matcha, chocolate, or red bean)
Instructions
Let the ice cream soften at room temperature for 5-10 minutes. Scoop the ice cream into small balls (about 1 tablespoon each) and place them on a parchment-lined tray. Freeze for at least 1-2 hours to firm up.
- In a heatproof bowl, whisk together the glutinous rice flour, sugar, and water until smooth. Microwave in 30-second intervals, stirring well, until the mixture thickens and becomes translucent (about 1.5 to 2 minutes). Let the dough cool slightly, making it manageable but still warm.
- On a dusted surface, divide the dough into small portions (about 8-10 pieces). Flatten each portion into a round disc, about 3 inches in diameter.
- Place an ice cream ball in the center of each dough disc and gently fold the dough around the ice cream, pinching the edges to seal the mochi. Dust with cornstarch to prevent sticking.
- Freeze the assembled Mochi Ice Cream for at least 1 hour to firm up.
- Serve immediately or store in an airtight container in the freezer for up to 2 weeks.
Notes
- For a vegan version, use plant-based ice cream and substitute a plant-based sweetener like maple syrup in the mochi dough.
- Dust your hands with cornstarch to handle the sticky mochi dough more easily.
- Feel free to use any ice cream flavor, from traditional favorites to exotic ones like mango or green tea.
- Prep Time: 20-30 minutes
- Cook Time: undefined
- Category: Dessert
- Method: No-bake
- Cuisine: Japanese
Nutrition
- Serving Size: 1 mochi
- Calories: 120
- Sugar: 14g
- Sodium: 15mg
- Fat: 5g
- Saturated Fat: 2g
- Unsaturated Fat: 3g
- Trans Fat: 0g
- Carbohydrates: 18g
- Fiber: 0g
- Protein: 1g
- Cholesterol: 10mg


