Why You’ll Love This Recipe
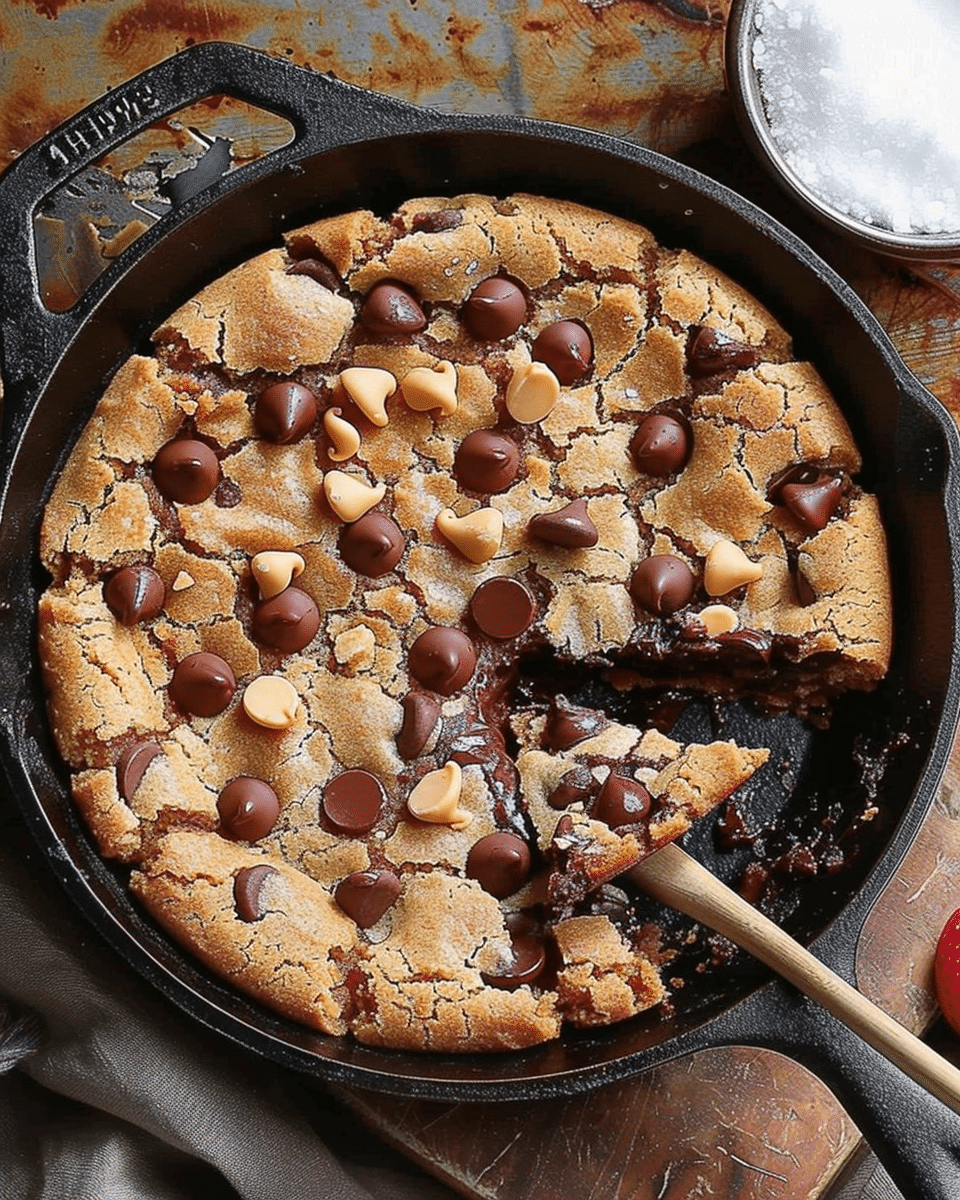
This skillet cookie combines the nostalgia of homemade chocolate chip cookies with the ease of baking everything in one pan. No scooping, no chilling—just mix, spread, and bake. It’s quick, indulgent, and perfect for everything from casual nights in to celebratory gatherings.
Ingredients
(Tip: You’ll find the full list of ingredients and measurements in the recipe card below.)
- All-purpose flour
- Baking soda
- Salt
- Unsalted butter (softened)
- Brown sugar
- Granulated sugar
- Egg
- Vanilla extract
- Semi-sweet chocolate chips (or a mix of chips and chunks)
Directions
- Preheat the oven: Set to 350°F (175°C). Lightly grease a 9-inch cast iron skillet or oven-safe pan.
- Mix dry ingredients: In a small bowl, whisk together the flour, baking soda, and salt.
- Cream the butter and sugars: In a larger bowl, beat the softened butter with the brown sugar and granulated sugar until light and fluffy.
- Add egg and vanilla: Mix in the egg and vanilla extract until smooth.
- Combine: Gradually add the dry ingredients to the wet, stirring until just combined. Fold in most of the chocolate chips, reserving some for topping.
- Spread in skillet: Press the dough evenly into the skillet and sprinkle the remaining chocolate chips on top.
- Bake: Bake for 20–25 minutes, or until the edges are golden brown and the center is just set. For a gooier center, bake on the lower end of the time range.
- Cool and serve: Let cool for 5–10 minutes before serving. Enjoy straight from the skillet or slice into wedges.
Servings and timing
This recipe serves 6–8 people.
Prep time: 10 minutes
Bake time: 20–25 minutes
Total time: 35 minutes
Variations
- Peanut butter version: Add 1/4 cup of peanut butter to the dough and swirl more on top before baking.
- S’mores skillet cookie: Add mini marshmallows and crushed graham crackers along with chocolate chips.
- Nutty addition: Fold in chopped walnuts or pecans for added crunch.
- Gluten-free: Use a 1:1 gluten-free flour substitute.
- Mini skillet cookies: Divide the dough into smaller skillets or ramekins for personal-sized desserts.
Storage/Reheating
Store leftovers in the skillet covered with foil or in an airtight container for up to 3 days at room temperature.
To reheat, place the skillet back in a 300°F (150°C) oven for 5–10 minutes or microwave individual slices for 10–15 seconds.
For best texture, avoid over-reheating to keep the center gooey.
FAQs
Can I make this without a cast iron skillet?
Yes, any oven-safe pan will work, or you can bake it in a round cake or pie dish.
Should I chill the dough before baking?
No chilling is required for this recipe, making it quick and convenient.
Can I use different types of chocolate?
Absolutely! Try white chocolate, dark chocolate, or even peanut butter chips.
How do I know when it’s done?
The edges should be golden and set, while the center may look slightly underbaked—it will continue to cook as it cools.
Can I make this ahead of time?
Yes, prepare the dough and refrigerate it for up to 24 hours. Bring it to room temperature before baking.
Is this cookie meant to be gooey?
Yes, that’s part of the charm! For a firmer center, bake a few minutes longer.
Can I freeze the dough?
Yes, press the dough into the skillet, wrap tightly, and freeze unbaked. Bake straight from frozen, adding 5–10 minutes to the baking time.
What’s the best pan size?
A 9-inch skillet is ideal, but you can use 8-inch for a thicker cookie or 10-inch for a thinner one—adjust bake time accordingly.
What toppings go best?
Vanilla ice cream, whipped cream, caramel drizzle, or a dusting of sea salt take it to the next level.
Can I double the recipe?
Yes, use a larger skillet (like 12-inch) or divide the dough between two pans. Watch the baking time carefully.
Conclusion
A Chocolate Chip Skillet Cookie is the ultimate dessert for sharing—crispy on the outside, gooey in the middle, and packed with melty chocolate in every bite. It’s fast, fun, and incredibly satisfying. Whether you’re enjoying it straight from the skillet or slicing it into wedges, this easy treat is sure to become a go-to favorite for any occasion.
Print
Chocolate Chip Skillet Cookie
- Total Time: 2 hours
- Yield: 9–12 bars
- Diet: Vegetarian
Description
Lemon Blueberry Crumb Bars are sweet, tangy dessert bars with a buttery crumb crust, a bright lemon-blueberry filling, and a golden, crumbly topping. Perfect for warm-weather gatherings or anytime you crave a fruity treat.
Ingredients
- For the crumb base and topping:
- 1 1/2 cups all-purpose flour
- 1/2 cup granulated sugar
- 1/4 cup brown sugar
- 1/2 teaspoon baking powder
- 1/4 teaspoon salt
- 1/2 cup unsalted butter, cold and cubed
- 1 large egg
- 1 teaspoon vanilla extract
- For the lemon blueberry filling:
- 2 cups fresh or frozen blueberries
- 1/3 cup granulated sugar
- 2 teaspoons cornstarch (3 tsp if using frozen berries)
- 1 tablespoon lemon zest
- 2 tablespoons lemon juice
Instructions
- Preheat oven to 350°F (175°C). Grease or line an 8×8 or 9×9-inch baking pan with parchment paper.
- In a large bowl, combine flour, granulated sugar, brown sugar, baking powder, and salt.
- Cut in the cold cubed butter using a pastry cutter or fork until the mixture resembles coarse crumbs.
- Mix in the egg and vanilla extract until a crumbly dough forms.
- Press about two-thirds of the crumb mixture into the bottom of the prepared pan to form an even crust.
- In another bowl, toss blueberries with sugar, cornstarch, lemon zest, and lemon juice until coated.
- Spread the blueberry mixture evenly over the crust.
- Crumble the remaining dough over the top of the blueberry layer.
- Bake for 40–45 minutes, or until the top is golden and the filling is bubbling.
- Let cool completely in the pan. For clean cuts, chill in the refrigerator for 1 hour before slicing into bars.
Notes
- Use cold butter for a crisp crumb texture.
- Fresh lemon zest and juice provide the best flavor.
- For a cleaner slice, chill the bars before cutting.
- Frozen blueberries can be used straight from the freezer—just add extra cornstarch.
- Double the recipe for a crowd and bake in a 9×13-inch pan.
- Prep Time: 15 minutes
- Cook Time: 45 minutes
- Category: Dessert
- Method: Baking
- Cuisine: American
Nutrition
- Serving Size: 1 bar (1/12 of recipe)
- Calories: 210
- Sugar: 16g
- Sodium: 85mg
- Fat: 9g
- Saturated Fat: 5g
- Unsaturated Fat: 3g
- Trans Fat: 0g
- Carbohydrates: 30g
- Fiber: 1g
- Protein: 2g
- Cholesterol: 35mg


